

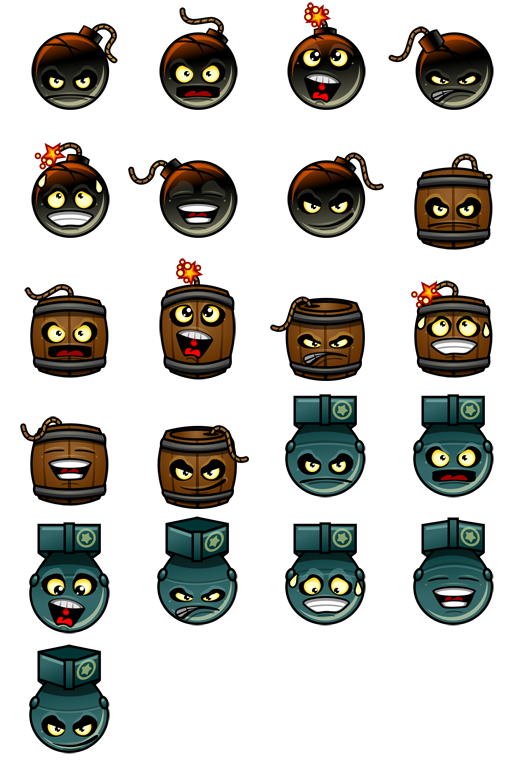
Designing Explosive Expressions
Inkscape tutorial

Designing a Cartoon Bomb

First of all, let’s start with a black circle and a smaller rectangle.
Secondly, Add a curvy line for the fuse. This lines just has 4 nodes and a medium thickness for the stroke.
Convert the lines to paths (Path/ Stroke to Path) in order to add a stroke to the fuse.
Move the objects in place and add some curve to the top rectangle to match the curve of the main shape.
In order to make the bomb look interesting I chose two lights with the primary light in a bright orange colour.


In order to do this, (rather plain shading which will be mostly hidden by the detail added on top of it) duplicate the black circle and scale it down. Give one a gradient fill from a orange to transparent and duplicate it with a grey gradient.
Repeat the duplicate, scale and gradient fill on the rectangle shape.
Create another duplicate of the circle, scale it down even more than before and duplicate this circle to use the 2nd circle to cut the white shape into a crescent. With 50% transparency it gives a nice shine.
Add a rotated duplicate of the crescent in grey in the lower right and some detail to the fuse.

Adding Expression

With the basic bomb done it’s time to add the facial features.
Let’s start with some cartoony eyes made up of a few circles.
Add another circle for the mouth. ‘Squash’ it and move the central nodes down.
Add a duplicate with 50% transparency below.
Add another circle to give the eyes some ‘sockets’. Deform the nodes to make it look like raised eyebrows.
A duplicate of the shape in a grey and put behind the black original makes it show on the black base.


Change the colour of the base of the eye to a dark yellow with a lighter duplicate inside makes them look less harsh.
Create a rectangle for eyelids to add expression to the eyes. Move the nodes to fit the ‘socket’ shape and the angle of the slant.
A lighter copy of the mouth shape brings some depth to the lips and shows them better on the dark back-ground.

Finally, with the basic elements in place it’s a matter of working out the expressions you are after… Adding different mouth shapes, squinting or enlarging the eyes.
Note:
I will add a page or two with the facial expressions here soon. For now I want to finish another tutorial I have been dying to complete first – a cartoony helicopter to take me back to one of my favorite jobs (doing the (pixel) art of HeliAttack 3 in 2005).
I hope you enjoyed this as much as I did. Honestly, I really missed doing tutorial art and writing these little posts.
Download
Get the art (png files) of this tutorial for free!
As a special treat to make up for the long time between tutorials I uploaded the explosives as PNG-images in 256×256, 128×128, 96×96 and 64×64 pixels to be used freely in your projects.


Great tutorial, thank you. The same thing you could tho with other vector drawing programs and even with flash. The tools are very similar.
Thanks… I do try and keep the tutorials simple and use inkscape as an example as it's a free tool… I know a lot of the readers of this blog have recreated the tutorials with Adobe illustrator and it works fine…
Thanks for posting a new tutorial, any tips on how to create a 2D game background? or tips on depth perception in a 2D background?
Great tutorial. In tune with the fall season, it would be cool to do a halloween background tutorial.
Awesome stuff, Chris! Love the kegs!
great tutorial, thanks for sharing Chris :)
Hey Chris,
First off I want to say that your tutorials are a immense help! Even if we are on 2 different programs. Could I ask for a mushroom cloud for this specific tutorial? That would be cool.
-Max
These tutorials are fantastic. I really appreciate you sharing your knowledge like this. Thanks!
It's my pleasure ;)
You have made some really good points there. I checked on the web for more info about the issue and found most individuals will go along with your views on this site.
Hi Chris. Your Tutorials are the best in the net.
I really love to see your great experience and your fantastic ideas. Also thanks for the shared emotional explosives…
Do you also have them as a donated svg?
Thanks…
Hi Chris,
Thanks for yours tutorials. They are great!
I would like to know if the png images of the emotional explosives are free for commercial use, with credit, of course.
Thanks,
Luis
Hi Chris,
This is the best tutorials.
I try repeat but in 6 step I can't find light objects. I would like to know where it is in inkscape?
Thanks.
Hi Vladimir… Sorry… there is no light objects. I just added the two light icons to illustrate the idea of where the light comes from for the illustration.