


Designing a Carved Pumpkin in Inkscape
Inkscape Tutorial
I created this illustration of a carved pumpkin as part of a challenge in an Inkscape social media group. It’s been another go at the new and improved features of Inkscape 1.0.1. It was also the middle of the night and I couldn’t sleep. In the end, I did get a little carried away with the blurs, gradients, and detail.
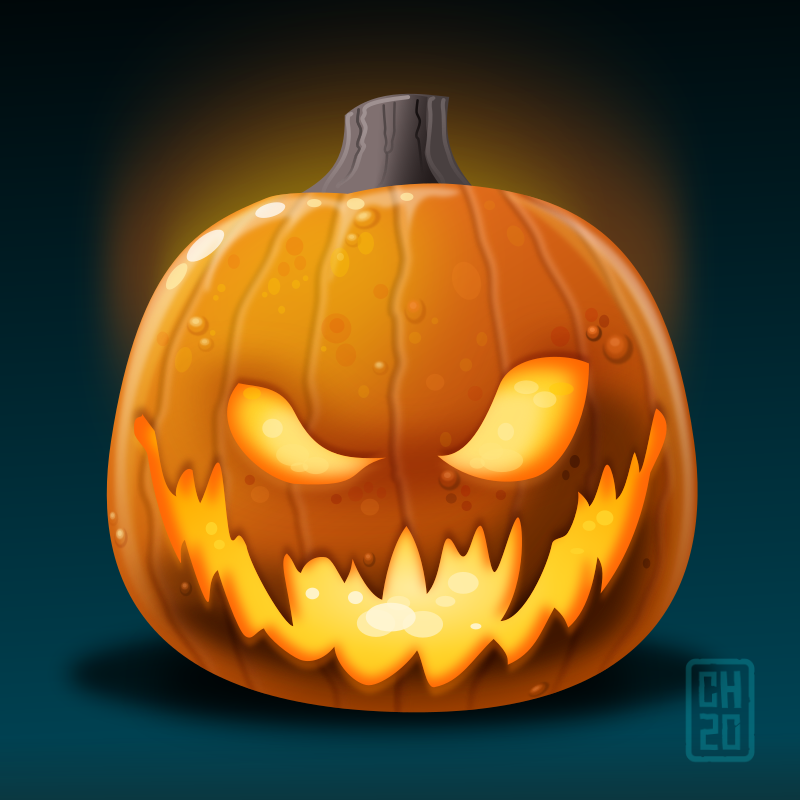
I didn’t keep the steps of the design, as it was not intended as a tutorial when I worked on it. So, now I did a breakdown and recreation of the pumpkin as a step-by-step tutorial to show the use of blurs, gradients, and blend modes. Those three are probably the most defining aspects of this design.
Let’s get started


Start with the usual circle, convert it to a path, and add two more nodes at the top. Deform the shape from the perfect round shape to a flatter bottom. Change the colour from fill to a gradient, shading darker towards the bottom.
Use the pen tool, draw the creases in a darker shade. One centre line and the sides [which can be mirrored]. Add more nodes to those lines, moving them to make the lines more uneven and organic looking. Finally, set the transparency down and the blend mode to multiply to get more vibrant shades.


Shading
Create some basic shading with a lighter and two darker shapes to give the pumpkin volume. For the lighter yellow shade use ‘Screen’ as the blend mode in the fill panel while the darker shapes should be set to ‘Multiply’. This will mix the colours and keep those shades more vibrant.
An added gradient matching the light source helps define light and shadow.
Blur
Use the blur on the shading shapes to get a nice smooth gradient. It might go over the base shape. That’s okay for now, as you can set a clip at a later stage. That will keep the overlapping elements bound to the base shape.
A circle, deformed to crescent, creates additional light [rim light]. A gradient towards the bottom and a glow blend these lights in nicely.


More highlights
Another highlight shape on the left side will bring out the light and the top of the grooves. Start with a duplicate of the crescent, take the blur off to edit it with the node tool. It’s hard to edit shapes with the blur active. Turn it to 0 and then put the blur back on after might be the easiest option. Alternatively, you can alter the View mode with [CTRL + 5].
Just having the dark lines for the grooves is not enough. Usually, there’s a highlight connected to the fold. Duplicate the line elements and colour them in light orange, set the blend mode to Screen, and offset them a little to the right. Give both the darker and lighter lines a little blur to soften them.
A gradient will blend the lighter lines nicely towards the bottom. Select the gradient tool and switch from fill to stroke with the icons in the top left-hand corner of the UI.


Setting a clip
Finally, group all shapes and copy the base shape at the very bottom. Paste it on top [CTRL-ALT-V to paste in place]. Select the shape and the group below and set the clip. All overlapping elements/ blurs will now be constrained by the base shape.
Note:
You can still work, edit, select the elements inside the clip – either via a CRTL-Click selection or through the Objects panel.
Lastly, create the stem. It’s a square, converted to a path and deformed. A duplicate in black with a gradient and some lines in lighter and darker shades give the necessary detail. Fade the lines with a gradient towards the bottom right, as our main light source for the base shape is in the top left.


Base shape
The current state is our basic pumpkin. It could do with a bit more shading in the centre to bring out the grooves but we are going to place the cut-out design there. A lot of the detail it would be covered. The same goes for elements giving it more pattern, unevenness, and colour variation. As we don’t know yet, how much of it would be visible in the end, those parts are going to be added at the end.
Continue with the Carving
Note:
Personally, I like to work with layers. They help me organize larger illustrations. Naming the layers makes it easy to turn parts of the design on and off. I even go as far as naming important groups in my designs to find them faster. This stage of the pumpkin was kept in its own layer and locked. A new layer for the carvings was created on top. I also saved a version of this as a separate file to fall back on.

Start with basic shapes for the mouth and eyes. Convert those shapes to paths, and turn the nodes to corners. Modify to turn the eyes into pointy shapes and the mouth to a big grin.
Use the node tool [N] and select all the nodes of the mouth. Insert more nodes – 3 or 4 times. Move the nodes inside the mouth shape to create the sharp edges. Convert all nodes to corners to get pointy ends.


Turn the mouth into a vibrant orange. Duplicate once to make the light yellow glow inside. A circular gradient makes the inner part even lighter. Scale the lighter shape down and blur it a little.
Use a duplicate of the orange shape to set the clip for the blurred yellow element.
Create another two duplicates of the orange base. One in a darker brown with 50% transparency and set it to Multiply. The orange shape is set to Screen. Blur both shapes and place them below the mouth.
Add a few semi-transparent white circles as additional highlights.


Repeat the same steps with the eyes – inner yellow shape and the two shaders plus some highlights.
With the carving done the pumpkin now looks something like this:

Details and Patterns
The final step in the design of our carved pumpkin is a little bit of pattern and detail. The surface of the pumpkin is rarely that smooth and even. Adding some discolorations and bumps will make it more interesting.
Yet another Layer
To keep the elements at bay, as we have quite a bit on the screen already, add another layer for the detail.

Relying on the trusted circle, use a crescent with two circles as highlights, set the transparency, and the blend mode [dark – Multiply/ light – screen]. Blur the shapes softly to look like a ‘wart’ on the surface of the pumpkin.
Added lighter and darker circles give that little bit of pattern/ discoloration.
Adjust the transparency of the elements as you copy them to match the shading of the pumpkin. Variation in scaling – and squashing the shapes towards the edges – help make it look more interesting.

Background
Lastly, the design needs a background to add to the mood. The pumpkin stands out a lot better on a darker background. Add a new layer, at the bottom of the objects stack, create a rectangle with a gradient. To maximize the impact, I chose a desaturated blue [being complementary to the pumpkin’s orange base colour] rather than go with plain black. The lighter blue allows me to add a shadow [a circle with a blur set to Multiply] to ‘ground’ the pumpkin. Finally, there’s a little bit of glow [another circle with a wide blur] for a bit of colour behind the design.
Final thoughts
This is just one of many approaches to create a pumpkin. By using simple shapes with blurs and gradients for the shading, I tried to keep it flexible and easy to edit. The two blend modes ‘Multiply’ and ‘Screen’ allow more vibrant shading compared to the ‘Normal’ blend. Layering complex illustrations helps organize large numbers of objects better via locking and switching their visibility. Clips help keep things in clean boundaries.
I hope you enjoyed this slightly more complex tutorial. It took longer to create than the pumpkin itself – by a long shot. :)


Love it. This is soooo good. Top Job!
Thanks… I am glad you liked it and I hope it’s helpful.
Thank you for these great tutorials. Really helps!
Awesome tutorials. Thanks. Also loved the Aurora Tutoroal.
Thanks… I am glad you enjoyed it. It was great fun writing that one. So much you can do with it. :)