


Designing Wooden Platform
Inkscape Tutorial
We put the ideas of the wood material tutorial into action by designing wooden platforms. These are often used and very versatile game art assets. Wether it’s building levels for you platformer or creating elements for the background, wood just looks nice. With a few easy steps you can quickly create great looking assets.
A lot of this tutorial is repeated here in a slightly less detailed way – you might want to reread the older tutorials if you run into problems.
Note:
If you work with bitmap output in mind I would suggest creating the platform as a bitmap first. This way you have the proper dimensions to work with. Import the bitmap and create the starting rectangle to match.

Let’s start creating wooden platforms

Let’s start with a rectangle.
Colour it in a shade of brown that stands out well from the background of your game.
Move the nodes to make the sides uneven. This gives it a less ‘perfect’ and more worn and organic feel.
Draw an uneven line to start on the wood texture.
Add some nodes if need to create an organic look.
Duplicate the line and move the nodes in those copies to create slight variations.


Convert the lines to paths (Path/ Stroke to Path) – if you want additional work and a more natural look.
Variate the line thickness by moving some of the nodes.
Add a rectangle for the hightlight and colour it along with the wood grain in a lighter shade of brown.
Change the transparency setting of the highlight colour to get a matching shade.
Duplicate the base shape to set a clip for the highlight and the wood grain (Object/ Clip/ Set).
Adding two circles for decoration with lighter transparent copies below and behind them.

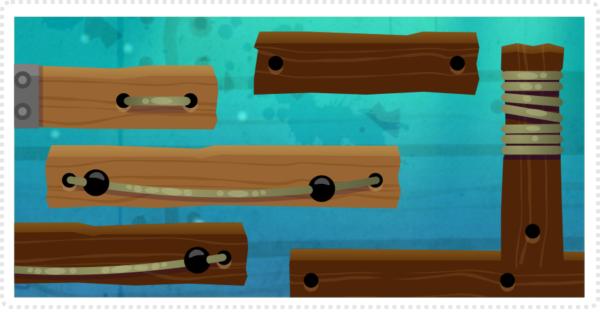
Create variations

Using the base shape it’s fairly easy to create variations.
Scale the width and modify the nodes at the ends to keep the.
Alter the colours – in this lighter version the grain colour is darker than the base.
Add a line between the two deco holes and curve it a little.
For more decoration add a circle.
Convert the circle to a path and add additional nodes to form an indentation.


Convert the ‘rope line’ to a path (Path/ Stroke to Path) and add a gradient fill to it.
Add some circles for highlights and you got the second platform looking distincly different from the first.
Rotate the base platform 90 degrees to create a vertical element.
Adjust the highlight for the shape as well as for the hole to match the top down lighting used for the base.
Convert the lines to shapes and add the rope colour gradient as well as some highlights.


Hi Chris! I have created many objects by inkscape, but wanted to know how I join to form the whole scenario of the game. It is with inkscape? The pirate game that you did for example how it was done? Takes a lot of your help, thank you!
Wow this is super helpful, Thanks!
I really like this type of tutorial, could you do a tutorial on making a platform with stone, dirt or metal?
Thanks so much for these awesome tutorials!
Alright, so I've been trying to do this for ages now – and I see this and I'm able to complete it in 10 minutes. Amazing!
Thanks Chris!
I work on the individual elements in inkscape then take them into a bitmap tool and make the pngs from there… I find it easier and have more control over the scene that way.
Great tutorial as always… cheers..
Hey Chris!
That's an amazing blog!
Thanks a lot for share these stuff!
Cheers!
Like I said before your work is next to nothing,
You have inspired my art work in many ways.
https://www.facebook.com/profile.php?id=100003719875206
Thank you so much.
Thanks so much for the great tutorials.
Can you do a tutorial on how to make a scene in the style of the one at the top of your blog and in the game 'Patapon' (silhouetted/ black and white characters on simple coloured backgrounds)
Thanks, keep it up!
Lovely art…
Could you please share or post a tutorial on how to create the background you have used in this scene ?
Much appreciated
You sir are a true inspiration. Thank you !
Great tutorials!
Could you please make a tutorial on how to create art like grass, water, dirty, trees, sky or maybe a part two of 'Continue the fun with squares'?
Thanks
Hi Chris,
I have been a hobby programming for some time, but I've never really been able to complete a game due to my lack of artistic skills when it comes to computer graphics. Now that I've been using your tutorials to learn how someone with no artistic skill can still create cool looking graphics, I'm inspired to complete a game or too thanks to your tutorials. Thanks!
Hi Benjamin… I am glad the tutorials helped you… and the 'no artistic skills' mindset is wrong… You have artistic skills you just need to learn how to get them out onto the screen… and with practice comes confidence and skill…
That's a great idea… I added it to the todo list… :)
awesome tutorial… much needed one… you are a life saver :)
Thanks :)
Great and useful tutorial!Thank you! My motivation to create games incresead after seeing and following this tutorial *-*
Here's my wood =P
https://p44i.img-up.net/Semttuloaca0.png
nice work…
Hello, first of all thanks for the tutorial! Nice work!
I have a question, how do I mask the lines with the rectangle so they fit? (paste inside)