


The video for this tutorial
is available here

Working with compound objects in Affinity Designer
Affinity Designer tutorial
This is another post on the underrated and often overlooked compound function in Affinity Designer. I will be working with simple circles to create complex compound objects.
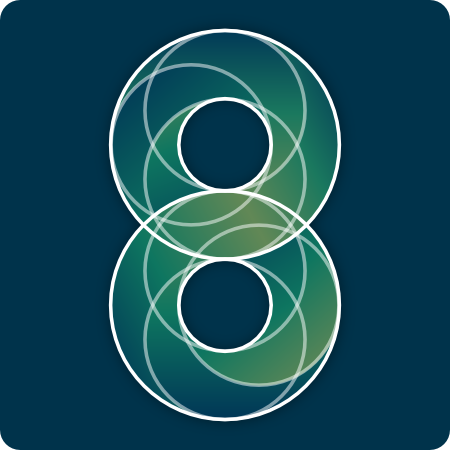
Let’s have a quick look at what I created in this tutorial. Here is the normal view and the outline view:
The whole design is basically made up of circles in three different sizes. These are duplicated and mirrored below. The tricky part is getting the overlapping and cut-out shapes right. Affinity designer doesn’t have Adobe Illustrator’s shape builder function.

Note:
I tried to simply use a Boolean ‘Divide’. I ended up with a whole bunch of splinter shapes and visual errors. One way to achieve this design is by breaking the curves and re-connecting them [s. this youtube video from idle hands].
You can also go in and create the base shapes and do a lot of Boolean ‘Subtractions’ to achieve the effect but I prefer the non-destructive approach with compound shapes. The tools for this approach are really simple:

The base shapes are all circles and there is no need to convert them to curves. Some of the circles will be converted to a pie and used at 1/4, 1/2 or 3/4 of the full circle. The elements will be combined into 6 compound shapes and finally assigned gradients.

Let’s start…

Start with the basic shapes: two circles – a larger and a smaller one inside.
Make a duplicate and align it below.
The ‘swirl’ inside is actually just a combination of 3 circles that go from the one side of the larger circle to the other side of the smaller circle.
They are placed centered and on one side, then duplicated and mirrored for the bottom circle.


Create the compound objects. Select the shapes and combine them via Layer/ Create Compound. You can either make two rings or combine both the larger and the two smallest rings to form the shape of the number 8.
The small circles are set to ‘Subtract’.
Duplicate the largest circle, convert it to a pie, and set it to just the lower left quarter.
Combine it with a duplicate of the midsize circle on the left, also converted to a pie and set to 3 quarters.
The third shape in the compound is a duplicate of the inner circle, which is set to ‘Subtract’.

More compound shapes…

To form the innermost swirl shape, set the bottom midsize circle to a half pie. Combine it in a compound with a duplicate of the smallest circle, which is again set to ‘Subtract’.
Next, create the top swirl going from all the way across the 8. Combine a duplicate of the largest circles with the remaining midsize circles, which are set to subtract.
Duplicate the large circles and set them to a 1/2 pie.
Combine these 2 halves into a separate compound object.


Combine this new compound object, set to ‘Intersect’, with the previous compound to get the curved shape.
Note:
Compound objects can be placed inside compounds to create more complex shapes.
Layered up in the right order the 6 shapes form the 8 with swirls.
Finally, apply the gradients for the shading.
One gradient starts dark, goes to one mid-tone and is lightest in the centre before going back to dark, while the other gradient is just dark to light.

Conclusion
This seemingly complex design is really just a few basic shapes. Compounds allow you to keep these shapes intact [e.g. to adjust the pie angles] rather than convert them to curves. You can combine them in the same way as Boolean operations. Try and find the basic shapes in complex designs before creating them. Quite often good designs are a lot simpler than they initially appear.
Note:
Compound objects [like Boolean operations] can only be created from vector shapes. Groups, text, lines, or bitmaps don’t work within a compound.
I hope you found this tutorial on working with compounds in Affinity Designer enjoyable and helpful. Play around with this awesome function, explore it, and have some fun with it!
More samples of working with compound in Affinity Designer


