


Isometric game art in vectors
Inkscape tutorial
What is isometric art?
According to wikipedia isometric projection is: ‘Isometric projection is a method for visually representing three-dimensional objects in two dimensions in technical and engineering drawings. It is an axonometric projection in which the three coordinate axes appear equally foreshortened and the angles between any two of them are 120 degrees.’
Now that’s a mouthful… and please… don’t ask me to explain it…. I just use it… ;) Basically it’s an attempt to fake a three dimensional feel in 2D by rotating the ground 45 degrees and ignoring the perspective scaling. This means objects do not get smaller when they are further away.
Let’s get started with some basic steps into isometric projection. This is close to ‘true isometric’ but not quite there – but a lot easier to handle artwise.
Note:
With different game engines you might encounter slightly different proportions as far as the vertical scaling goes… but the process of creating the elements would be very similar.
Let’s start


Let’s start with a square.
Rotate it by 45 degrees.
Scale the height to half it’s size.
Duplicate the shape and select both the nodes at the top and right.


Move those two nodes to the left and down to connect to the bottom shape.
Duplicate the top shape again and select the left and top node this time.
Move these nodes down and right to connect to the right side of the bottom shape.
This creates the base cube.


Let’s add some colour and determine the light’s direction.
I chose a light source in the top right. As a result, the top is lightest and the left side darkest.
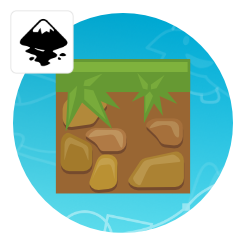
Add some decor with a few deformed circles (keep the ½ scale in mind) and a few triangles with a colour gradient.


Create variations of the blocks to make it look less repetitive. Usually, it works fine by simply rearrange the decor shapes.
By creating more blocks (e.g. a pure grass block) will allow you to variate the terrain you can build with your tiles.

Conclusion
Creating isometric tiles is a bit more time consuming. Things get deformed, skewed and squashed. Yet, it’s an appealing look and well worth it. You might find it easier creating elements in frontal view first. Afterwards, you skew and adjust them to fit the angle. E.g. rather than draw a door for a house in isometric view, create it with rectangles. Once done, skew the finished element to match the isometric setup.
A main problem you will encounter when creating whole scenarios in inkscape based on ‘isometric blocks’ is the depth sorting. It will only look right if the tiles are stacked properly. The tiles furthest away (top left corner of the screen) are on the bottom of the pile and the closest (front right corner) are on top of the other shapes.
Layering your scene can be quite helpful. E.g. make a layer with water tiles, then the ground tiles on top, the decoration on a layer above that.
I hope you enjoyed this quick post and it’s a start into the creation of isometric tile-sets. The next part of this tutorial will be props and buildings (and I will do characters and animations as well.).
Finally
Turning on the snapping in Inkscape makes aligning nodes in step 5 a lot easier.
Turn on the snapping View/ Snap (%) to align nodes precisely to others. In the snap button bar there is a button to ‘snap nodes or handles’ (7th from the top) and by turning on the sub-function ‘snap to cusp nodes’ (10th from the top) allows you to snap nodes perfectly.
In case it’s still not as responsive as you would like go to the Inkscape Preferences (Shift+Ctrl+P) and change the weight for the snapping there.


wow, i literally found this blog yesterday and flipped through it looking for tips on making isometric scenes. great timing on this article :)
awsome work dude :) isometric !!! loving this post everybit
Great stuff, keep it up. I'm a coder and learn something new from your articles everytime.
Thanks, guys… the next one is in the making – building a small house, tree, rock and wall/ fence elements.
For isometric work , i use the isometric grid available in inkscape.
Thanks for your blog, I look forward to further ! ;)
I'm still not tired to say it: awesome as usual!
I tried the iso/ axonometric grid and I had problems snapping to it… that's why I just snapped to objects instead… but yes… the grid is a big help when working with straight lines and isometric views… Thanks… I should have mentioned it in the tutorial… :)
Could you make a tutorial on game backgrounds?
Could you give some clarification on Step 5? I'm not sure how to move the nodes into alignment to form the sides of the cube.
Great tutorial! Waiting for next ones on isometric art.
I added a section to the tutorial… Thanks for pointing it out.
i love this tutorial, u are great!!!!
Awesome. I love the isometric tiles, it is really something that works will in a tile based game. Have you put any thought into making a tutorial for characters that are done in the isometric style? Like your caveman or pig model where it is broken up into pieces.
Me and some friends spent ages looking around for something like your website, it is oddly hard to find a vector based 2D art page where you can look and see how it would work/look as well as pick up some sprites to be able to utilize within a project until you can pay an artist to do custom stuff for you.
Thanks
I'm still completely lost. So I duplicate the square, then select "Edit paths by node" but then what? Would it be possible to get a step-by-step for exactly how you do this? Thanks!
Im so stuck :( I've turned on snapping put it still wont let me move into the places you describe
I love this tutorial! this tutorial is awesome! Maybe you have plan to create tutorial how to create isometric characters?
Would love a tut on iso character creation.
Bad angle for isometric cubes.
Best practices is using 26.565°.
I'm pretty sure he means:
1 – Duplicate the Top (Right Click, Duplicate or Ctrl+D)
2 – Convert Object to Patch (Path > Object to Path or Shift + Ctrl + C)
3 – Using the 'Edit paths by nodes' (F2):
4 – Drag the corner from the top-centre to the bottom-left and the top-right to the bottom-centre
5 – Repeat for the opposite side – you should be able to get the picture?
I seriously love your blog.. Excellent colors & theme.
Did you build this site yourself? Please reply back as I’m attempting to create my own site
and would love to know where you got this from or just what the theme is called.
Cheers!
my blog; jogos de fazenda
Is there any chance you could do one with isometric characters?
How did you make the dirt block? and combine it with the grass block in step 6?
I can't seem to get it, did you duplicate the grass block and change the copy to a dirt block? i tried it but it only stretch the original block.
Awesome tutorial btw.
Yes… I duplicared the shape and moved the nodes upwards to the midpoints of the first object ( sorry for forgetting about that step ). I added it to the list of 'fixes' to the tutorials that I hope to find time for in the very near future.
Nice work, but I don't understand middle picture, how I can get cube edge how it shows in middle picture….
I added another panel. I didn't explain it too well in the 1st version.
Thanks! :)
26.565° doesn't (really) apply to vector art, it's to get a smooth line when pixelating isometric cubes…
I had make it in my own version. But it always looks weird
thanks
Hi Chris! I'm a big fan of your work and I've learned so much through your tutorials. Instead of using two shapes and joining the nodes, are there any advantages/disadvantages to using a hexagon and Path+Difference to create a similar cube?
I just found out the angle from using your method is closer to 25.65 degrees, using the hexagon is 30 degrees. Which is better? Also, how much should I move the second shape down in order to create a perfect cube?
Ultimately it will depend on your game engine. There are 'standards' and m sample didn't stick to it. I just wanted to show the workflow of creating isometric style art in inkscape.
cool
It looks awesome. One thing: there's a guy in Brazil who copied your tutorial and made a video about it using the exact same shapes, colors e designs but didn't gave credits to you. I already said on comments so everyone know.
https://www.youtube.com/watch?v=ra_ASfs0I48
Great tutorial! Waiting for next ones on isometric art.
It’s truly a nice and useful piece of information. I’m glad
that you shared this useful information with
us. Please stay us informed like this. Thank you for sharing.