


Aligning a design to a circle in Affinity Designer
Affinity Designer Quick Tutorial
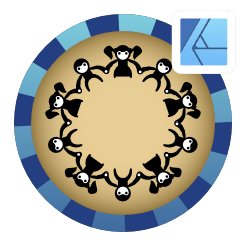
Let me show you an easy way to align a figure to a circle in Affinity Designer by using symbols. Symbols are a very helpful tool. Originally, the question was posted on a social media site. How to create a design like this with matching figures?

Let’s get started…

Create a little simple figure. You can add complexity and details later.
To keep it simple and easy to edit, I used lines with a tapered stroke for the arms and legs.
Group the elements fo the figure and make it a symbol.
Create a circle and centre the pivot point of the symbol to the centre of the circle.
Duplicate [CTRL + J] and adjust the rotation (360 / number of figures you want). Duplicate again and again to fill the circle.


The figures might not line up right, are too big or too small.
You can edit all figures by select one and editing it. Add detail, move the arms, legs, etc. to match up.
I scaled mine up and move the hands to match up.
You can also have a symbol in a symbol.
The base figure is one symbol. Group it and make another symbol. Add the hair and the skirt.
By deleting some of the old figures and duplicating the new ‘altered’ symbol I can add variation and still keep it very editable.

Variations to the figure aligned to a circle in Affinity Designer

Alterations are a breeze once you set up the symbols. It’s no problem to take the figure and have 20 instead of 10 figures in the circle. All it takes is a little scaling and adjusting. You can add colour and detail to all figures at once with ease.

This concludes the tutorial on how to align a figure to a circle using symbols in Affinity Designer. I hope you enjoyed it as much as I did. I am still tempted to do a few more variations… but will stick to the video for now. :)


