


Creating patterns along a path in Inkscape
Inkscape tutorial – part 2
I am following up on the 1st part on pattern creation in Inkscape. It’s getting a little more ‘advanced’ this time around. Previously, I created vector brushes in Affinity Designer to make scales for a dragon. In this tutorial, I want to replicate it in Inkscape. As the body bends, patterns are a quick way to design the texture. It’s a fast way to add detail. It would be cumbersome to manually place the scales or groups of scales along the body.
The fact that Inkscape uses vectors for this task is a massive advantage. It allows conversion to paths once you are done. Effectively, it enables you to edit and fine-tune designs once the ‘hard work’ is done.
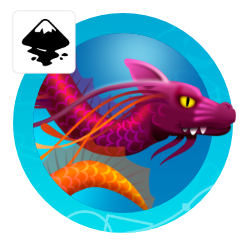
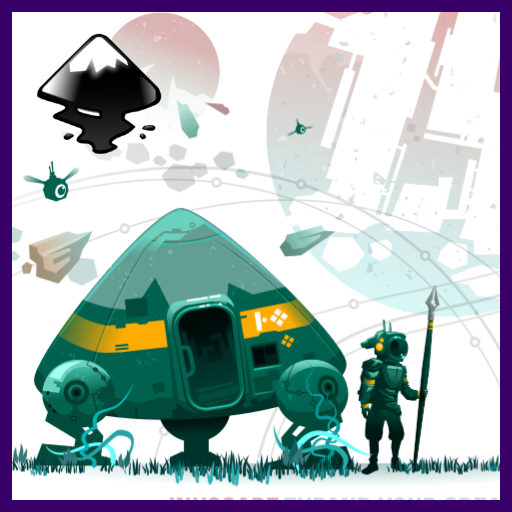
This step-by-step tutorial shows the creation of something like this:

Main tools


Let’s start creating patterns along a path in Inkscape
Start with a rectangle, round one side, convert it to a path, and curve the left side to match. This is our base scale. Duplicate and align vertically. Create a repeating pattern. Select all scales and combine them with Path/ Union [CTRL + +] to create one path.
Note:
Unlike Affinity where a pattern/ brush can consist of multiple shapes, shading, and overlaps, the pattern in Inkscape has to be one curve. It requires an adjusted approach. The scales are simplified compared to the Affinity Designer Version and there is neither shading nor overlap.
Select the scale shape and copy it to the clipboard [CTRL + C]. Use the pen tool to create a line/ path for the pattern. Go to Pat Effects, and add a new effect.
Choose ‘Pattern along path’ and click the ‘Link to path in clipboard’ to assign the grass. Set the pattern to ‘Repeat’ or ‘Repeat, stretched’.


Curve the path with the node tool and the pattern should follow.
Colour the scales using the gradient tool.
The body shape
Using the pen tool create a path for the body shape. Assign an outline and add a new Path Effect ‘Taper’ to it to make the tail end thinner.
Convert the stroke to a path.

Note:
Oddly, I couldn’t get one shape but an out shape plus cutout. Separate those with Path/ Break apart [Shift + CTRL + K] and delete the outer shape. Alternatively you can create the whole body with the pen tool or just edit the taper with the node tool. The idea is to create a long curved body shape.

Clipping
Next, clip the scales to the body shape. As Inkscape doesn’t allow a pattern along a path to taper via the Path Effects, we place the pattern inside the body shape.
Use the curved path as a base for two extra shapes for shading. Add a lighter highlight shape [Blend mode set to ‘Overlay’] and a darker shadow shape [Blend mode set to ‘Multiply’] on top of the scales to add depth to the body.
As you can’t have more than one path, you have to get creative at times. Combine two patterns by creating two shapes. The shapes share similar dimensions but should have the same width. Assign them to identical paths [simply duplicate and change the pattern assigned]. The spikes overlap the curved fin pattern. After adjusting the gradient and the opacity they look like one object.


Another way to use the ‘Pattern along path’ is by stretching an object rather than repeating it.
Choose ‘Single, stretched’ in the Pattern option dropdown to stretch the pattern along the length of the path. It will follow the curves of the path and deform accordingly.
Adjust the colours. Play around with the gradients to create variation by moving the points of the gradient.


I added a dragon’s head from an earlier tutorial, adjusted the colours and copied some of the base scale paths on top to match the head to the body.

Finally, I added a background with an elliptical gradient. Some blurred circles as well as another pattern made of circles add a little detail. Even if it’s different in its approach, the results in Inkscape can match those in Affinity Designer.
Files for ‘Creating patterns along a path in Inkscape’
You can download the Inkscape .SVG, .PDF and .affinity files
from here.
As always, I hope you have fun with the tutorial on creating patterns along a path in Inkscape. I enjoyed writing it. Working through the initial issues was interesting. Ultimately, I ended up with a nice design.
Have fun, keep creating and never stop experimenting!


Great tutorial! I do hope some day we can get pattern along a path with things other than simple shapes.
I made this holographic snakes effect a while ago, which uses text as the pattern for the LPE and a clipped texture i made in Gimp.
https://1.bp.blogspot.com/-_FZzX4Ne3ss/XwSsnwHxcBI/AAAAAAAAFCE/FDNE8CjScWoq3-8OvYCaDwsCP0LCUCxnACLcBGAsYHQ/s1600/HolosnakesV2.jpg
That looks awesome!
Thanks, i appreciate it !!!