


Vector brush creation in Affinity Designer
Affinity tutorial – part 3
In the first part I went through the basics. Part two was a bit more complex with the dragon scales. This part will start covering the creation of simple image brushes in Affinity Designer. The image brushes don’t just have a shape but also add colour to the brush stroke. Initially, that would make little sense. A stroke usually gets the colour from the stroke colour or gradient. Now, the pattern will be tinted by the stroke colour.
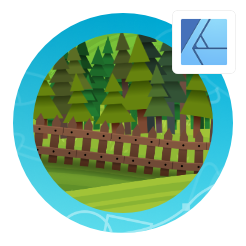
Let’s have a quick look at what I created in this tutorial – with a normal view and an outline view:
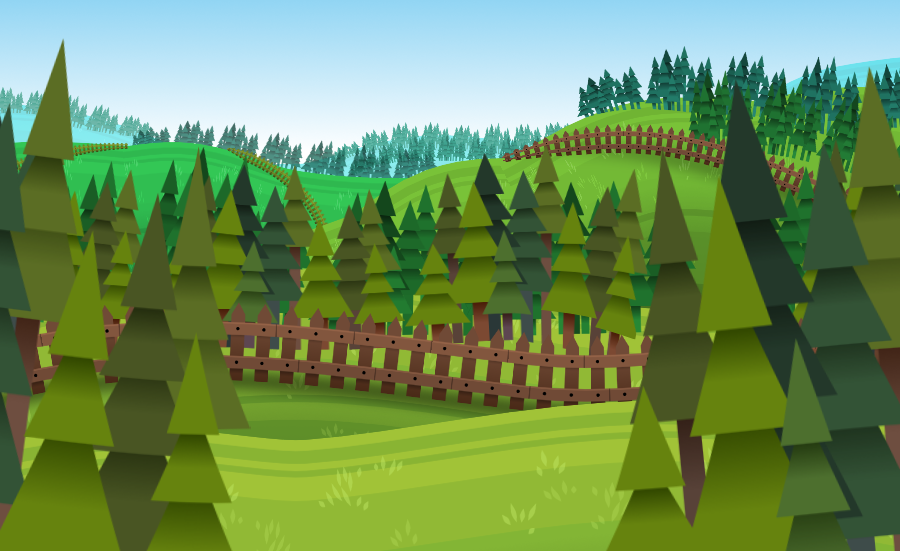
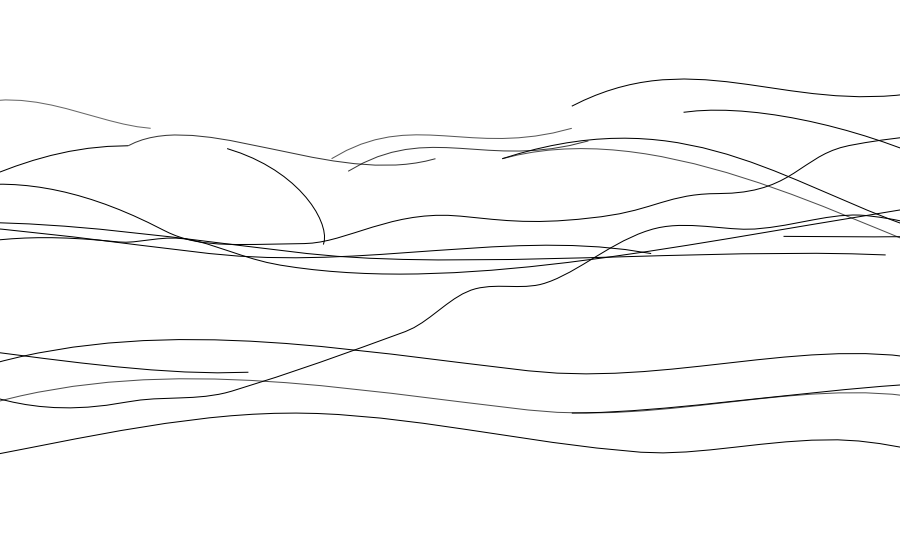
As you can see, the whole design is based on repeating patterns that are assigned to just a few curved lines. The grassy ground, the fence, and the pine trees are the patterns I chose for this tutorial.

Note:
Affinity Designer calls these brushes ‘vector brushes’. In reality, they are no vector shapes. The brushes are bitmap images scattered or stretched along a vector line. They work fine for illustrations to add detail and pattern to your design. Yet, these brushes can not be expanded to curves like a normal, solid stroke. It is, effectively, a bitmap object in your vector design. Consequently, this may cause the usual limitations when it comes to scaling or exporting for cutting or lasering.

Let’s start…

Let’s start with a square with a green gradient.
Duplicate the shape and vary the height. Give the copies slightly lighter shades creating an interesting pattern.
Add some detail to the ground with some small grass shapes.
A short line done with the pen tool and an altered pressure on the stroke does the trick nicely.
I decreased the opacity of the grass as the background gets darker to avoid it from standing out too much.


Export the pattern as a PNG [File/ Export]. I usually export my PNG images at a minimum of 512 x 512px at 72dpi.
Go to the ‘Brushes’ panels and click on the menu icon [top right] and select the ‘New Textured Image Brush’ option and choose your brush pattern PNG file.
Click on the brush to open the settings. Alter the ‘Size Variance’ to allow the brush to react to pressure and set the ‘Body’ to ‘Repeat’.

Testing the texture brush…

Let’s try the brush on a curved line.
Create the line, select it, and clear the stroke color [should it have one]. Otherwise, it will overlap the texture.
Click on the brush to assign it.
Texture image brushes can still be tinted but the stroke colour reacts with the brush colours.
These four lines with the grass vector brush have different stroke colours and stroke sizes.


Let’s add a fence as another repeating element.
A couple of rectangles make let you quickly put together a segment.
Export the design as a PNG. Make sure the transparent background is ticked in the ‘Document Setup/ Colour’.
Create another texture image brush with the fence PNG, set the ‘Size Variance’ and the ‘Body’.


Try the vector brush on a curve.
Stroke colour on image brushes
The image brushes will take on the stroke colour but it’s a mix. The original colours will show through. The stroke colour will require some saturation, while the brush will have to have some darker elements. White parts in the image brush will not take on colour, while white, grey, or black [colours without any saturation] will all render the brush pattern grey.
The fence can flow with the hills. The pattern of the vector brush will bend and with the stroke pressure adjusted get shorter or higher.
Lines in the distance can get a tint to blend with the grass.
A blurred line [with lowered opacity and the blend mode set to ‘Mulitply’] at the bottom of the fence suggests shadow.


Let’s add a third pattern to the scene.
Create a group of fir trees from triangles and a rectangle for the trunk. Group the elements of a tree and add an HSL adjustment layer to change the saturation of a copy or recolour them with a tint of blue or aqua.
After creating another texture brush, add a few lines with the tree brush.
Scale, tint and adjust the curves to match the scene.


Variation is key
Try different designs, mix brushes, go crazy. The tools allow for all sorts of fun. Once I got started it was hard stopping as new ideas developed as I went along. I am sure I will have a lot more fun with brushes in the future.
I used some basic shapes for this tutorial. You can go crazy with your designs. Throw some fancy and more intricate designs at your brushes. There is a lot of fun to be had with this.


This concludes the third part of vector brush creation tutorials in Affinity Designer. I hope you enjoyed the tutorial and it gave you some ideas and techniques for your own creations. Please give me your feedback, comments, and requests to make the tutorials better, clearer, or more interesting.
Have fun with Affinity Designer and keep on creating!


Wow, the examples all look super impressive !