


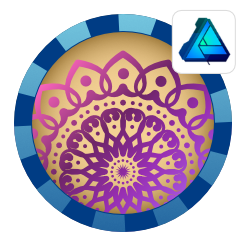
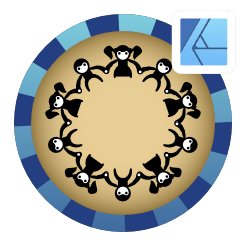
Designing a Circular Pattern in Affinity Designer
Affinity Designer Tutorial
Here’s another quick tutorial on a topic covered in quite a few youtube videos already. Yet, they usually use the pixel persona/ a bitmap tool to draw the design. It can be done with vectors and be editable with ease and speed.
Start with a circle…

Start with a circle as a ‘guide’. For the pattern I went with some basic shapes starting with a heart, turning it into a symbol, taking the fill to a pressure-adjusted stroke, and then adding more deco to this symbol getting thinner as I go closer to the centre of the circle.
Duplicate the symbol, flip it horizontally and vertically or do a 180 degrees rotation. Place the duplicate below the original and group the two.


Duplicate the group and rotate it. Holding SHIFT will rotating will ‘lock’ the angles to 15-degree steps. Alternatively, you can use the Transform panel and set the rotation in there.
Keep duplicating to fill the circle.


Seeing the shape is a symbol, any change you make to one of the symbols will be done to all the elements. Editing and altering should be very easy. Add more lines, shapes, or text to the design to ‘grow it’ outwards.
I added a gradient overlay FX to the layer containing the design for a bit of extra polish.
Note:
I prefer to work with layers rather than groups because it feels easier and faster. It allows me to select each element with a click instead of CTRL-click [as the click would select the group].
Playing around with the colours and the backgrounds or adding drop shadows can lead to interesting results.

I hope you liked this quick hack, if so try it out and have some fun with it. I certainly did. Enjoy!


