Affinity Designer
Review
I want to share the first experience I had with the beta version of Affinity Designer by Serif. The tool has been out for Mac for a while (there is a free trial version available as well as purchase version for £39.99). It has received much praise as an alternative to Adobe Illustrator. Serif released the beta version for windows a few weeks ago.
https://affinity.serif.com/en-gb/designer/
The free public beta version for windows can be found here:
https://affinity.serif.com/en-gb/windows/
I tried version 1.5.0.5 on my Windows SurfaceBook and am quite impressed with the ease of use. The features provided by the program are great.
First Impression
If you have been working with any vector design tool before (Illustrator, CorelDraw or Inkscape) the basic set of tools will look very familiar.
The toolbar at the top has three unique icons though. The tool lets you switch between a vector design mode [draw persona] and pixel paint mode [pixel persona] and the batch export [export persona]. Next to those are tools to help you arrange, layer, snap and combine your shapes. All the icons are pretty clear and there is a tooltip when you hover over an icon for a little longer.
The UI elements matched the resolution of my laptop. At a resolution of 3000×2000 pixels, in my Microsoft surfacebook’s standard mode, Illustrator and CorelDraw make it hard to select nodes and node handles. They become very, very small and are not scaled when zooming in. Like Inkscape Affinity Designer scales these nicely to make it easy to select and modify the objects. All input displays are scaled and big enough to read.
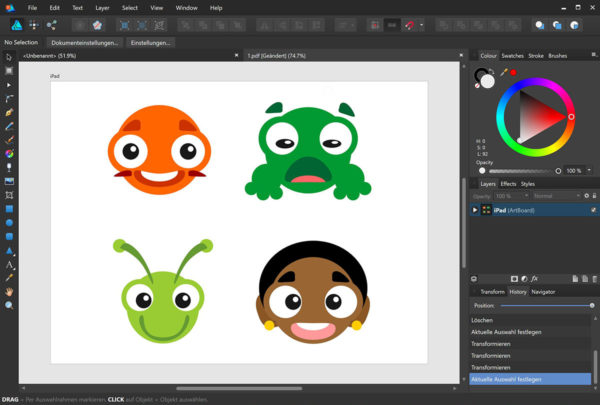
The toolbar on the left hand side has your usual tools. In vector mode it allows you to allow you to move objects, change the canvas, edit nodes, or edit corners. There is tool for different types of drawing, edit the fill and the transparency. Preset standard objects (rectangles, circles, rectangles with rounded edges and a nice set of predefined shapes ranging from triangles to hearts, arrows and even editable cogs) can be selected from here.
Note:
I really liked the canvas setting as it offered a choice of device-specific settings such as iPad, iPad pro or iPhone 6. It’s a very helpful feature when designing a full-screen layout. The background illustration matches the desired proportions and sizes from the start.
Features:
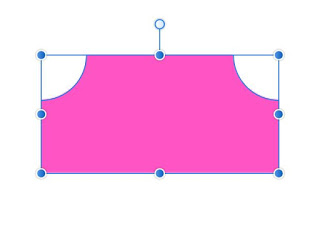
Another nice feature is the corner tool allowing easy modifying of the corners of a node. It offers 5 different shapes from plain to rounded and rounded inverse to steps. The amount can be quickly altered by dragging a marker or by entering a value.
To the right you have your colour panel (with the HSL colour wheel as preset but more schemes to pick from), swatches to help you organize frequently used colours, strokes to define the outlines and brush settings.
The layer panel underneath is very user-friendly. Showing preview icons makes selecting elements via the layers panel easy. Affinity Designer offers the essential tools you need when working with layers, such as locking and hiding elements or layer groups for easier handling.
The bottom right holds another panel for transforming, showing and editing your history and navigating the display area.
Here’s the resulting illustration while trying some of the frequently used features. I was combining objects, using gradient fills, opacity and opacity gradients. Overall, I was impressed by how easy it was to use the tools and modify the design.

Note:
To me, the shortcuts are the key to working with a tool efficiently. Affinity Designer has some shortcuts set in unusual ways like the duplicate on CTRL + J. Those can be altered quickly in the settings to fit your own needs and habits.
To sum it up:
I will definitely spend more time using this tool. I want to explore the more advanced features. As far as creating illustrations and artwork for games, the program has convinced me. Its ease of use and the good quality of exporting the artwork to bitmaps is excellent. The results can easily be used inside the game engines.
I will write a more complete review with the pros and cons once I scratched more than just the surface. A comparisons to the tools I have been using in the past would be nice.
Eventually, I will cover some of the tools and the workflow of Affinity Designer on this blog in the future. It’s very easy to use this program. It offers a large set of tools ideal for creating vector graphics and illustrations.
Finally, let me know in the comment section if there is any interest in covering more on Affinity Designer.
Note:
Affinity Designer is being frequently updated. The newest version might already be different from the one I base this initial post on.






Hi Chris,
As the reader of your blog and as the user of Affinity Designer, I very much would like to see more articles about this great tool.
Thanks for your work.
Thank you for writing this; I had no idea this program even existed. I love Inkscape, and know it quite well, but it has hardly improved in the past few years. I would love to read more, and am curious to see whether you'll recommend switching from Inkscape to Affinity Designer.
have been trying out Affinity Designer myself so would love to see some tutorials and reviews.
Hello Chris,
I have tried Affinity and I guess it is an awesome editor, I just can't figure out how to convert an object to path (like in clouds tutorial) lol.
Cheers
The conversion from an object to a path is done with (CTRL + RETURN) or via a right click on the object. A menu drop downs and it has the convert to curves option there.
Thanks mate, I really appreciate your fast responses :)
While i appreciate every single post you make on this blog, im slightly worried about the state of Inkscape tutorials. Your blog has been one of the very few places where the more advanced users can learn something new. All of the other places have become a complete noob-fest.
Inkscapeforum is now helpdesk-central. Aaron Nieze hasnt posted something new for over a year and Nick Saporito is milking a legion of noobs to make a living on YT.
Its all a bit depressing.
I have to admit I am not following other tutorials on inkscape. I started writing my style of game oriented tutorials due to a lack of simple to follow tutorials.
As for inkscape itself, I am a little disappointed in the latest updates and the lack of improvement in usability. The reason I posted about Affinity Designer is the ease of use and the clean and clear UI. The software is a lot more approachable for beginners and offers a wide range of tools and possibilities for graphic design pros. Even though it's not open source and freely available at the price tag Serif is putting on it (currently only on the mac version) it is a very affordable alternative to Adobe Illustrator. I find it worthy of covering in a more in depth review and some tutorials to show a few of the advantages this software has over Inkscape (e.g. transparent gradients, bitmap integration, bitmap editing or the very user-friendly layer system – something that is rudimentrary at best in inkscape).
Great Review , thank you . For hobbyist stuff, Affinity is perfectly fine. But if you’re looking toward a career in design, you need to know Adobe.
I have a XP-Pen Artist 24 Pro Display drawing tablet and Affinity Designer . Works for me . and these new “Affinity” programs are really good, first made for Mac only; they have now been brought up to speed with Windows versions and more in the pipeline.
AD may not have all the features of Illustrator, but it’s close. The UI is more intuitive and the workflow is far more seamless. Also not a huge fan of Adobe’s subscription model.