


Complete Game Project [part4] Enemy design
Inkscape Tutorial
The next part in the complete game project is the enemy design. Enemies should match the style of the main character, yet stand out enough not to be mistaken for decor or background elements.
In this game (the super crate boy style platformer I am aiming for) they should be clearly identifiable as targets. Consequently, I want them to stand out well.
Note:
A common problem with a lot of ‘coder art’ I have seen is the inconsistency in style. This becomes even more visible when the art for the game is ‘collected’ from across the internet. It’s perfectly alright for game engine testing to use whatever is available as long as you remember to bring it inline and replace the bits that are not matching before publishing the game.

Let’s get started on Enemies

With the main character in place it’s time to do some enemies to match.
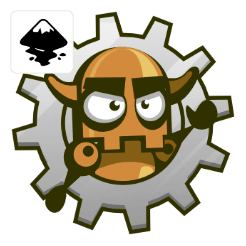
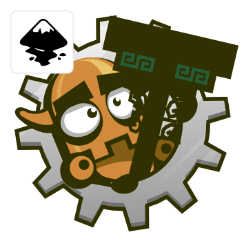
For a consistent look and feel it’s helpful to reuse some elements of the main character for the enemies.
Altering some elements and recolouring others turns the ‘good guy’ bad.
This might be a decent mini-boss design.
For our normal enemies we just keep the eyes and go the long time favorite RPG enemy – the blob. The body is a squashed circle with the bottom node moved up.
Let’s keep the eyes of our main character. Change the eyebrows a little for a more evil look, remove the iris and give them a yellowish colour.


Duplicate the main body and scale it down a little.
Another two duplicate shapes squashed horizontally are used for the shading.
Use ‘Path/ Difference’ to cut the inner shape (purple) out of the bigger ine (pink) and then separate the two sides with ‘Path/ Break Apart’.
For this game you would want the enemies to stand out from the background. The blob will be smallish in size (like the player we will export them at just 48x48px).
With the platforms and background still undefine let’s give the enemy a preliminary colour of ‘zombie green’ (RGB 126,200,126).

Enemy Design continued

A few lighter and darker circles add some detail and ‘bubbly’ look to the blob’s design.
One of the advantages of creating elements in vectors is the ease to recolour them later on.
Let’s take the blob and scale him up a bit for the bigger enemy.
Increase the eyebrows for a more evil look and bring the eyes up a little.
A slightly different colour scheme makes the ‘big blob’ stand out.


As a final touch we take the horns from our main character and deform the a little bit (squashed vertically and stretched horizontally).
In order to fit to the blobs body shape, curve the left side of the horn.
A darker duplicated version of the horn goes behind the body shape.
The third (and final) blob will be a scaled down version of the first design.
In order to keep the outlines consistent we need to scale the inner shape a little bit more.
Removing the eyes and some of the details gives us a mini blob.

Exporting those three designs to our player size of 48×48 pixels looks like this:
More posts in this series:


Sweet. Great article!
Great work!
Reusing elements from the character for consistent look is a good approach and save time. I didn't think in it.
Very useful Chris :)
Amazing that such simple shapes make so cool looking characters. Wow
Thanks
Loving the new tutorial
As a pure Game Developer, the Game Art always was the "ugly" part of the development.
Now i found this blog… and seriously… it's awesome. Learning to draw good art AND having fun with it, i thought this was impossible :D
Thanks, and hopefully you will go on with many more tutorials!
Its Awesome how simple it seems to be creating characters and stuff im full programmer but now that I see your post I'm thinking doing my own assets for my next game
teach me sensei amazing art :D
Pretty cool tutorial awsome art :D
Thank you so much for posting these tutorials. I've done all of them from the beginning to this point and I feel like I'm learning a lot each time and it's giving me confidence. Very much appreciated!
Wow… Thanks… I am impressed that you made it through all them…