


Complete Game Project [part3] Polishing the Character Design
Inkscape Tutorial
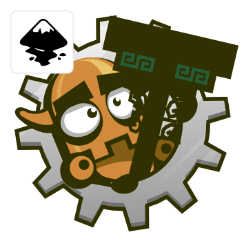
This is the third part of the complete game project series and focuses on polishing the character design. We now have all shapes in place and the basic shading works. It’s time to tweak the character to give him a more character before creating some test poses.
The last bitmap test showed that the legs are a tad too small and face is rather generic. At the moment, the robot is looking straight at us with both eyes perfectly symmetrical.

Polishing to the Game Character

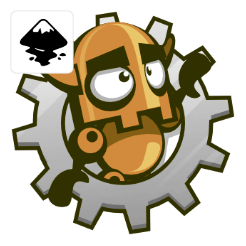
Let’s get started with the legs. In order to give him bigger (more visible) legs, the body needs to be scaled to give the legs more room.
A slightly smaller body and the legs larger and closer to the centre of the body makes him look a bit more dynamic and less chubby.
It might look a bit more interesting if the head was not looking straight at us in the idle pose and for the running left and right we would need the bot to look in the direction he’s going anyway.
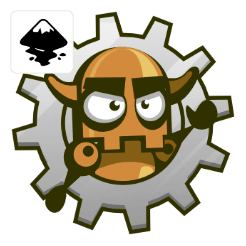
Let’s start by moving the eyes to right a bit and scaling the width of right eye down a little.


Scaling down the iris a little makes him look less ‘surprised’.
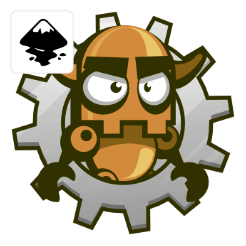
Adding teeth made of four rectangles (2 for the darker part and 2 for the brass) gives him more of a recognizable mouth and a bit of bite.
As the final touch for the head widen the base and make the horns a little smaller.
Reduced height for both eyes makes them more oval and a little bit meaner.
Duplicated eyebrows are deformed and used to cast some shadow on the eyes.

Testing the Design
Let’s try out a few poses that we would need in the game to see how well the robot works for the games need. Next to the idle there will be a run, jump, shoot and die.
This is where the pink boxes come into play. The idea is to keep all poses within the lighter pink box in order to create images of the same size.

In the more dynamic poses like the jump wide and jump up or the getting hit, our main shape leaves the inner box but I kept the pose well within the outer box that will function as the export border.
Exporting the above pose with both containers at 64x64px will give these results.


Once we do the animations we keep the border boxes and set them to fully transparent when creating the png images. This will give us images with the exact same sizes for implementation into the game or creation of a sprite sheet.
More poses
Let’s look at setting up a run pose.

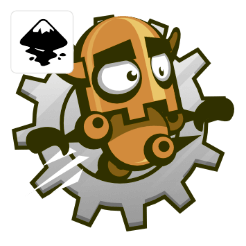
Let’s start with an extreme run pose. The right leg is in front and the left leg goes behind body. Start by rotating both legs. Next we move the whole robot down a bit.

Let’s start with an extreme run pose. The right leg is in front and the left leg goes behind body. Start by rotating both legs. Next we move the whole robot down a bit.The right arm would be back and the left arm would move forward – the opposite of the legs. Rotate the arms and bring the shoulders further towards the centre of the body. The hand would show less of the thumb. Move the ‘thumb-node’ inwards and smooth the curves of the original hand to achieve the effect.

By moving the eyes further to the right and squeezing the right eye even more, the robot will look more in the direction of his run. Bring in the right horn match this effect of a more rotate head. Tilting his head adds some dynamic to the pose.
(Ideally the ‘teeth’ be scaled and moved as well.)
Wrapping up the Polishing of the Character Design
With the character design pretty much done, it’s time for the next steps. We will design the enemies and the background and platforms. Match the colours and style will be a prime objective.
Get the source files for the robot character [svg, pdf, png and spine] for free!
More posts in this series:


That's cute
This character has been thought to walk side by side, so from left to right and from right to left, but you created it with a 3/4 face. Is there a specific reason, not to depict it in profile, or it is just an aesthetic reason?
Just aesthetics… If you just see one eye without a nose on the character it turns into a cyclops real easy. Two eyes also allow more expression when we get to animation later on – looking surprised, happy, sad, etc.
Great work man, but I have one question. Do you use any reference imager or something? Because I'm trying to create some character for the an game that I'm doing, and I have an ideia of how they should look, but when I go to Inkskape I end with some really poor designs.
Anyway, keep going with those greate tutorial and please forgive my english :)
Greeatings from Brazil!!!
Great job Chris! This tut is really amazing and easy to do. Tks to share for us.
More greetings from Brazil !!
:-)
This is it..!! Just Awesome tutorials for Inkscape and game design. I was searching a lot for this kind of tuts (for programmer..yeah..). Thanks Chris, your style of presenting this is best. Straight to the point. Thanks a lot.
Just wanted to say thanks for the tutorials Chris! They are easy to do and have a great amount of detail. I really feel like I'm progressing each time I do one. It was a little overwhelming to know where to start with game art, and I'm really glad that I found your website :-)